Neevia
PDFresize
user’s manual
version 4.5
https://neeviaPDF.com/PDFresize
License Agreement
ELECTRONIC END USER LICENSE AGREEMENT
For One (1) Computer
This is an End User License Agreement. This is a contract. If you install this software, you must abide by the terms of this agreement. This license is applicable to all software products sold by Neevia Tech. The term software includes upgrades, modified versions or updates. This software is licensed and not sold. Only a non-transferable and nonexclusive right to use the Neevia products is granted to the end user.
The following are definitions that should be noted by the user:
a. COMPUTER/SERVER
This is a single computer owned, rented or leased by a single individual or entity on which one or more applications load and execute software in the memory space of that computer. Software is installed on a server for one or more users. All computers/servers must be licensed to utilize Neevia software.
b. VIRTUAL SERVER
This is a single computer or a virtual machine (a software implementation of a machine that executes programs like a physical machine) that is owned, rented or leased by an individual or entity that turns around and rents or leases access to others. The virtual server may have one or more applications on it for the end users to use. The purpose of the virtual server is to give multiple users access to many software programs.
c. DEVELOPMENT
This means that you are programming a specific application or tool that will interact with the software that you are licensing from Neevia Tech.
THIS IS A CONTRACT BETWEEN YOU AND NEEVIA TECH. YOU SHOULD CAREFULLY READ THIS LICENSING AGREEMENT AND MUST ACCEPT ALL THE TERMS AND CONDITIONS BEFORE INSTALLING THIS NEEVIA SOFTWARE. BY INSTALLING THE SOFTWARE, YOU ARE AGREEING TO BE BOUND BY THE TERMS AND CONDITIONS OF THIS LICENSE. IF YOU DO NOT AGREE TO THE TERMS OF THIS LICENSE, DO NOT INSTALL THE SOFTWARE, AND DO NOT USE THE SOFTWARE. IF YOU VIOLATE THIS AGREEMENT, YOU WILL BE SUBJECT TO LEGAL ACTION BY NEEVIA TECH.
Subject to the payment of applicable license fees, Neevia Tech grants you a nonexclusive right to use its accompanying Neevia software product and related documents (the Software) in the terms and conditions provided as follow:
LICENSE
Until such time as Neevia has issued a valid serial number to you, you may only use this software for a 30-day trial period. You agree to remove any copies of the software after the expiration of the trial period. No license is issued to you until you are issued a valid serial number.
You cannot use a license for the software concurrently on different computers. You may install and use the Software in a single location on a hard disk or other storage device of one computer only.
(a) Home Use:
The primary user of each computer on which the Software is installed or used may also install the Software on one home or portable computer. However another person may not use the Software on a secondary computer at the same time the Software on the primary computer is being used.
(b) File Server or Network Use:
You may keep one copy of the Software on a single file server only for the purposes of downloading and installing the Software onto a hard disk of up to the Permitted Number of Computers that are on the same network as the file server. No other network use is permitted.
(c) Operating system or Language versions:
If you receive two or more copies of the Software with different operating systems or language versions, the total aggregate number of computers on which all versions of the Software are used may not exceed the Permitted Number of Computers. You may not rent, lease, sublicense, lend or transfer versions or copies of the Software you do not use, or Software contained on any unused media.
(d) Archiving:
You may make one copy of the Software solely for archival purposes. If the Software is an upgrade, you may use the Software only in conjunction with upgraded product. If you receive your first copy of the Software electronically, and a second copy on media afterward, the second copy can be used for archival purposes only.
For all Neevia Tech products, you agree that you will only use our software on a server and all applications that will access the server will reside on the server and you will not permit remote access to the software except through your application residing on the server. You agree to surrender your license(s) if you violate this agreement. If you violate this agreement, you will not receive a refund upon termination of this license. You agree not to utilize our software to violate the copyright of any third parties. If you do violate the copyright of a third party utilizing our software, you agree to hold Neevia Tech harmless and will indemnify Neevia Tech for any such activity even if the violation is unintentional.
COPYRIGHT
The Software is owned by Neevia Tech and/or its suppliers, and is protected by the copyright and trademark laws of the United States and related applicable laws. You may not copy the Software except as set forth in the "License" section. Any copies that you are permitted to make pursuant to this Agreement must contain the same copyright and other proprietary notices that appear on or in the Software.
You may not rent, lease, sub-license, transfer, or sell the Software. You may not modify, translate, reverse engineer, decompile, disassemble, or create derivative works based on the Software, except to the extent applicable law expressly prohibits such foregoing restriction. You may use the trademarks to identify the Software owner's name, or to identify printed output produced by the Software. Such use of any trademark does not give you any rights of ownership in that trademark.
NO WARRANTY LICENSED SOFTWARE (S) - "AS IS"
The Software is provided AS IS. NEEVIA TECH AND ITS SUPPLIERS MAKE NO WARRANTIES, EXPRESS OR IMPLIED, AS TO THE MERCHANTABILITY, QUALITY, NONINFRINGEMENT OF THIRD PARTY RIGHTS, FITNESS FOR A PARTICULAR PURPOSE, AND THOSE ARISING BY STATUTE OR OTHERWISE IN LAW OR FROM A COURSE OF DEALING OR USAGE OF TRADE. THE ENTIRE RISK AS TO THE QUALITY, RESULTS BY USING THE SOFTWARE, AND PERFORMANCE OF THE SOFTWARE IS WITH THE END USER. Some states or jurisdictions do not allow the exclusion or limitation of incidental, consequential or special damages, or the exclusion of implied warranties or limitations on how long an implied warranty may last, so the above limitations may not apply to you or your company.
LIMITATION OF REMEDIES AND LIABILITY
NEEVIA TECH OR ITS SUPPLIERS OR RESELLERS SHALL NOT UNDER ANY CIRCUMSTANCE BE LIABLE TO YOU FOR ANY DAMAGES, INCLUDING BUT NOT LIMITED TO SPECIAL, INDIRECT, OR CONSEQUENTIAL DAMAGES, LOST PROFITS OR LOST SAVINGS, OR FOR ANY CLAIM BY A THIRD PARTY, ARISING OUT OF THE USE OR INABILITY TO USE THE SOFTWARE, EVEN IF NEEVIA TECHNOLOLGY SHALL HAVE BEEN INFORMED OF THE POSSIBILITY OF SUCH DAMAGES, OR FOR ANY CLAIM BY ANY OTHER PARTY.
GENERAL
This Agreement shall be construed, interpreted, and governed by the laws of the State of Florida, excluding the application of its conflicts of law rules. The United Nations Convention on Contracts of the International Sale of Goods, will not govern this Agreement. If any part of this Agreement is found void and unenforceable, it will not affect the validity of the rest of the Agreement, which shall remain valid and enforceable according to its terms.
If you need to redistribute this product with your own software products, you need to contact Neevia and negotiate a separate licensing and royalty agreement.
You may not ship, transfer, or export the Software into any country or used in any manner prohibited by any export laws, restrictions or regulations.
UPGRADES
You must be properly licensed to install upgrades to Neevia Software products. Neevia upgrades replace and or supplement the previous product that formed the basis for your eligibility to for the upgrade. You may use the upgrade only in accordance with the terms of this Agreement. Upgrades may not be separated and used on separate computers.
GOVERNEMENT USERS
For United States government users, the Software and associated Documentation are deemed to be "commercial computer software" and "commercial computer documentation", respectively pursuant to DFAR 227.7202 and FAR 12.212(b) as applicable.
ENTIRE AGREEMENT
You acknowledge that you have read this Agreement, understand it and agree to be bounded by its terms and conditions. It is the complete and exclusive statement of the Agreement between us, which supersedes any proposal or prior agreement, oral or written, and other communication between us relating to the subject matter of this Agreement.
CONTACT INFORMATION
neeviaPDF.com
Tel: (954) 893.9343
Email: info@neeviaPDF.com
Table of Contents
Installing and Uninstalling Neevia PDFresize
How to register Neevia PDFresize
Using the Command Line Interface to resize PDF files
Using the COM Interface to resize PDF files
Using the .NET assembly to resize PDF files
PDF Encryption related properties
PDF Initial View & Metadata related properties
Using the graphic interface to resize PDF files
APPENDIX A. Predefined paper sizes
Neevia PDFresize is a software product that can be used to resize (scale or crop) PDF files.
It comes as a command line tool, graphic interface application, COM object and .NET assembly.
Supported platforms are: Windows 2003, Vista, 7, 2008, 2012, 8, 10, 2016, 2019 - 32 and 64 bit.
Installing and Uninstalling Neevia PDFresize
Before installing and/or using this product, please make sure you have carefully read the copyright notice and agreed to all of its terms. If you have any questions about the licensing agreement, feel free to call (954) 981.9252 or send an email to sales@neeviaPDF.com.
To install Neevia PDFresize:
download and save the https://neeviapdf.com/prods/PDFresize_setup.exe file onto your hard drive. After downloading the file, double-click on it and follow the instructions. The installation procedure automatically detects your operating system, copies the needed files into your system directory and installs Neevia PDFresize.
Unattended installation:
To perform an unattended (silent) installation launch the PDFresize installer with /sp /very silent /norestart command line switches. Here is the full list of supported switches:
/SP
Disables the "This will install... Do you wish to continue?" prompt at the beginning of Setup.
/SILENT, /VERYSILENT
Instructs Setup to be silent or very silent. When Setup is silent the wizard and the background window are not displayed but the installation progress window is. When Setup is very silent the installation progress window is not displayed. For example error messages during installation are displayed and also the startup prompt (if you haven't disabled it with '/SP' command line option explained above). If a restart is necessary and the '/NORESTART' command is not used (see below) and Setup is silent, it will display a “Reboot now?” dialog. If it's very silent it will reboot without asking.
/NOCANCEL
Prevents
the user from canceling during the installation process, by
disabling the Cancel button and ignoring clicks on the close button.
Useful along with /SILENT.
/NORESTART
Instructs Setup not to reboot even if it's necessary.
/DIR="x:\dirname"
Overrides the default directory name displayed on the Select Destination Directory wizard page. A fully qualified pathname must be specified.
/GROUP="folder name"
Overrides
the default folder name displayed on the Select Start Menu Folder
wizard page.
/user="username", /company="company name", /serial="serial number"
Use these switches to pass the registration info (username, company name and serial number) to the installer.
To remove Neevia PDFresize from your computer:
1. Select Settings -> Control Panel from the Start menu.
2. In the Control Panel click Add/Remove programs and select Neevia PDFresize from the applications list.
3. Click the Add/Remove button to remove the program. A confirmation prompt is displayed.
Unattended uninstall:
To perform an unattended (silent) uninstall, launch unins000.exe from the folder where the application has been installed with /verysilent /norestart command line switches. Here is the full list of supported switches:
/SILENT, /VERYSILENT
When specified, the uninstaller will not ask the user for startup confirmation or a message stating that uninstall is complete. Shared files that are no longer in use are deleted automatically without prompting. Any critical error messages will still be shown on the screen. When '/VERYSILENT' is specified, the uninstall progress window is not displayed. If a restart is necessary and the '/NORESTART' command isn't used (see below) and '/VERYSILENT' is specified, the uninstaller will reboot without asking.
/NORESTART
Instructs the uninstaller not to reboot even if it's necessary.
How to register Neevia PDFresize
After you downloaded the product run the installer and at the end of the process enter your registration info. If you do not have a serial number and simply want to test the product select Evaluate Product then click Finish. To register via the graphic interface right click on PDFresize.exe select Run as administrator, click About -> Register -> copy and paste your licensing info.
Using the Command Line Interface to resize PDF files
By default, the PDFresize command line application is located in the c:\program files\neeviaPDF.com\ PDFresize\cmdLine folder.
Usage: CLresize.exe <inputfile> [outputfile] [options]
<inputfile> PDF file to resize.
[outputfile] Output PDF file. If left blank it will be the same as the input file
Supported Options
-u <password> User password to input PDF file
-ver <value> 2,...,7. Output PDF file version
-v verbose (output more details)
-lin Linearizes output PDF file
Example:
CLresize.exe c:\input.pdf c:\output.pdf -u password -lin
-paper Paper size to use for resizing. See Appendix A for a full list.
Example:
CLresize.exe c:\input.pdf c:\output.pdf -paper letter
-orientation <value> Page orientation
possible values:
0 - portrait(default)
1 - landscape
2 - auto
Example:
CLresize.exe c:\input.pdf c:\output.pdf -paper letter -orientation 1
-w <value> page width
-h <value> page height
-units <value> measurement units for page width / height
possible values:
1 - inches
2 - centimeters
3 - millimeters
4 - points (default)
Example:
CLresize.exe c:\input.pdf c:\output.pdf -w 10 -h 8 -units 1
-scale Scale page content
Example:
CLresize.exe c:\input.pdf c:\output.pdf -paper letter -scale
-proportional Constrain proportions when scaling
Example:
CLresize.exe c:\input.pdf c:\output.pdf -paper letter -scale -proportional
-pos Place the original page content in:
possible values:
center
left-bottom
right-bottom
left-top
right-top
left-center
right-center
center-top
center-bottom
Example:
CLresize.exe c:\input.pdf c:\output.pdf -paper letter -pos center
Encryption settings:
-owner <value> Owner password to use for encrypting output PDF file
-user <value> User password to use for encrypting output PDF file
-rc4 Uses 128 bits RC4 encryption
-aes Uses 128 bits AES encryption
-aes256 Uses 256 bits AES encryption
-aes256v2 Uses 256 bits AES R6 encryption
-onlyattach Encrypts only attachments
-nometa Does not encrypt PDF Metadata
-perms <value> PDF security permissions to use for encrypting output file
flags:
p - document printing is denied
c - changing the document is denied
s - selection and copying of text and graphics is denied
a - adding or changing annotations or form fields is denied
The following flags are defined for 128/256 bits encryption:
i - editing of form fields is disabled
e - extraction of text and graphics is disabled
d - document assembly is disabled
q - quality printing is disabled
Example:
CLresize.exe c:\input.pdf c:\output.pdf -paper letter -owner test -aes -perms pcs
-title <value> Sets output PDF file title to <value>
-author <value> Sets output PDF file author to <value>
-creator <value> Sets output PDF file creator to <value>
-subject <value> Sets output PDF file subject to <value>
-keywords <value> Sets output PDF file keywords to <value>
Example:
CLresize.exe c:\input.pdf c:\output.pdf -paper letter -title "Daily Report"
-openmagn <value> Sets open magnification (in %) for output PDF file
Possible values:
0 - Default
1 - Actual size
2 - Fit Page
3 - Fit Width
4 - Fit Height
5 - Fit Visible
-openpage <value> Sets open page for output PDF file
Example:
CLresize.exe c:\input.pdf c:\output.pdf -paper letter -openmagn 50 -openpage 1
-pm <value> Specifies how output file should be displayed when opened in PDF viewer.
Possible values:
0 - Default view
1 - Page only
2 - Outlines (bookmarks) visible
3 - Thumbnail images visible
4 - Optional content group panel visible
5 - Attachments panel visible
6 - Full screen mode
-pl <value> Specifies page layout to use when output file is opened in PDF viewer.
Possible values:
1 - Displays one page at a time (default)
2 - Displays the pages in one column
3 - Displays the pages in two columns, with odd numbered pages on the left
4 - Displays the pages in two columns, with odd numbered pages on the right
5 - Displays the pages two at a time, with odd numbered pages on the left
6 - Displays the pages two at a time, with odd numbered pages on the right
Example:
CLresize.exe c:\input.pdf c:\output.pdf -paper letter -pm 2 -pl 1
-hidemenubar Specifies if PDF viewer should hide menu bar when output file is displayed
-hidetoolbar Specifies if PDF viewer should hide toolbar when output file is displayed
-hidewindowui Specifies if PDF viewer should hide user interface elements when output file is
displayed
-fitwindow Specifies if PDF viewer should resize the document's window to fit the size of the first displayed page
-centerwindow Specifies if PDF viewer should position the document's window in the center of the screen
Example:
CLresize.exe c:\input.pdf c:\output.pdf -paper letter -hidetoolbar -hidemenubar
<inputfile(pages)> PDF file to resize.
(pages) page(s) to be resized - can be a number or several numbers
divided by comma. Use 0 to resize from current to last page
<outputfile> output PDF file.
If left blank then it will be the same as input file
Using the COM Interface to resize PDF files
Class ID
PDFresize.Neevia
Example:
Visual Basic: Set NVresize = CreateObject("PDFresize.Neevia")
Delphi: NVresizes := CreateOLEObject("PDFresize.Neevia")
Using the .NET assembly to resize PDF files
To use the PDFresize.NET interface for resizing PDF files, in Visual Studio go Project -> Add Reference ->.NET and select PDFresizeNET from the list. After this:
Visual Basic: Dim NVresize As New PDFresize.Neevia
Visual C#: PDFresize.Neevia NVresize = new PDFresize.Neevia();
Properties
version
Returns the PDFresize version
Syntax
value = NVresize.version
Data Type: String
Linearize
Specifies whether the resized PDF file should be linearized (optimized for fast Web View).
Possible values: true, false (Default value: false)
Syntax
NVresize.Linearize = value
Data Type: Boolean
PDFPassword
Specifies the open password to use when resizing an encrypted PDF file.
Syntax
NVresize.PDFPassword = value
Data Type: String
Pages
Pages to be resized. Can be a number or several numbers divided by comma. Use 0 to resize from current to last page.
Syntax
NVresize.Pages = value
Data Type: String
Paper
Paper size to use for resizing. See Appendix A for a full list.
Syntax
NVresize.Paper = value
Data Type: String
Orientation
Page orientation. Possible values: 0 - portrait (default) 1 - landscape 2 - auto
Syntax
NVresize.Orientation = value
Data Type: Integer
PageWidth
Specifies the page width.
Syntax
NVresize.PageWidth = value
Data Type: Float
PageHeight
Specifies the page height.
Syntax
NVresize.PageHeight = value
Data Type: Float
Units
Measurement units to use for page width / page height.
Possible values:
1 - Inches
2 - Centimeters
3 - Millimeters
4 - Points (default)
Syntax
NVresize.Units = value
Data Type: Integer
Scale
Specifies whether to scale the page content when resizing.
Syntax
NVresize.Scale = value
Data Type: Boolean
ConstrainProportions
Specifies whether to constrain proportions when scaling page content.
Syntax
NVresize.ConstrainProportions = value
Data Type: Boolean
Position
Specifies where to position the original page content in the resized document.
Possible values: "center", (center the content on page)
"left-bottom", (place in the left - bottom corner)
"right-bottom", (place in the right - bottom corner)
"left-top", (place in the left - top corner)
"right-top", (place in the right - top corner)
"left-center", (place vertically centered, at the left side of the page)
"right-center", (place vertically centered, at the right side of the page)
"center-top", (place horizontally centered, at the top of the page)
"center-bottom". (place horizontally centered, at the bottom of the page)
Syntax
NVresize.Position = value
Data Type: String
PDF Encryption related properties
PDFEncrypt
Specifies whether the output PDF file should be encrypted.
Possible values: true, false (Default value: false)
Syntax
NVresize.PDFEncrypt = value
PDFEncryptMetaData
Specifies whether the metadata in the output PDF file should be encrypted.
Possible values: true, false (Default value: true)
Syntax
NVresize.PDFEncrypt = value
PDFEncryptionType
Specifies the encryption algorithm
Possible values: "rc4", (high - 128 bits RC4 encryption - Acrobat 5-and-later compatible)
"aes", (high - 128 bits AES encryption - Acrobat 6-and-later compatible)
"aes256", (high - 256 bits AES encryption - Acrobat 9-and-later compatible)
"aes256v2", (high - 256 bits AESR6 encryption - Acrobat 9-and-later compatible)
Syntax
NVresize.PDFEncryptionType = value
Data Type: String
Note: Will have effect only if PDFEncrypt = true.
PDFUserPassword
Sets the user password in the output document. Users will be asked to enter this password before Acrobat Reader allows them to view the document.
Syntax
NVresize.PDFUserPassword = value
Data Type: String
Note: Will have effect only if PDFEncrypt = true.
PDFOwnerPassword
Sets the output document owner password. This option will force the user of the PDF to enter a password before Acrobat Reader allows them to change the user password and security permissions.
Syntax
NVresize.PDFOwnerPassword = value
Data Type: String
Note: Will have effect only if PDFEncrypt = true.
PDFPermissions
PDF security permissions to use for encrypting output file. Possible values:
p - document printing is denied
c - changing the document is denied
s - selection and copying of text and graphics is denied
a - adding or changing annotations or form fields is denied
The following flags are defined for 128 bits encryptions:
i - disables editing of form fields
e - disables extraction of text and graphics
d - disables document assembly
q - disables high quality printing
Syntax
NVresize.PDFPermissions = value
Data Type: String
Example:
NVresize.PDFPermissions = "pcsaiedq"
PDF Initial View & Metadata related properties
DocumentTitle
Sets the output document Title field.
Syntax
NVresize.DocumentTitle = value
Data Type: String
DocumentSubject
Sets the output document Subject field.
Syntax
NVresize.DocumentSubject = value
Data Type: String
DocumentAuthor
Sets the output document Author field.
Syntax
NVresize.DocumentAuthor = value
Data Type: String
DocumentKeywords
Sets the output document Keywords field.
Syntax
NVresize.DocumentKeywords = value
Data Type: String
PageMode
Specifies how output file should be displayed when opened in PDF viewer. Possible values:
0 - Default view
1 - Page only
2 - Outlines (bookmarks) visible
3 - Thumbnail images visible
4 - Optional content group panel visible
5 - Attachments panel visible
6 - Full screen mode
Syntax
NVresize.PageMode = value
Data Type: Long
PageLayout
Specifies page layout to use when output file is opened in PDF viewer. Possible values:
1 - Displays one page at a time (default)
2 - Displays pages in one column
3 - Displays pages in two columns, with odd numbered pages on the left
4 - Displays pages in two columns, with odd numbered pages on the right
5 - Displays pages two at a time, with odd numbered pages on the left
6 - Displays pages two at a time, with odd numbered pages on the right
Syntax
NVresize.PageLayout = value
Data Type: Long
OpenMagnification
Specifies the open magnification (in %) for output PDF file. Default value: 100
Syntax
NVresize.OpenMagnification = value
Data Type: Long
OpenAtPage
Specifies the open page for output PDF file. Default value: 1 (first page)
Syntax
NVresize.OpenAtPage = value
Data Type: Long
FitWindow
Specifies if PDF viewer should resize the document's window to fit the size of the first displayed page.
Possible values: true, false
Syntax
NVresize.FitWindow = value
Data Type: Boolean
CenterWindow
Specifies if PDF viewer should position the document's window in the center of the screen.
Possible values: true, false
Syntax
NVresize.CenterWindow = value
Data Type: Boolean
HideMenuBar
Specifies if Acrobat Reader should hide the menu bar when displaying the output PDF document.
Possible values: true, false
Syntax
NVresize.HideMenuBar = value
Data Type: Boolean
HideToolbar
Specifies if Acrobat Reader should hide the toolbar when displaying the output PDF document.
Possible values: true, false
Syntax
NVresize.HideToolbar = value
Data Type: Boolean
HideWindowUI
Specifies if Acrobat Reader should hide the user interface when displaying the output PDF document.
Possible values: true, false
Syntax
NVresize.HideWindowUI = value
Data Type: Boolean
Methods
ResizePDF
Resizes the specified PDF file.
Syntax
Res = NVresize.ResizePDF( fileToResize, outputFile )
Parameters
fileToResize - PDF file to resize.
outputFile - output PDF file name.
Example
Res = NVresize.ResizePDF("c:\input.pdf", "c:\out.pdf")
Remarks
Res<>0 on error
Return codes
0 - Success
-1 - General resizing error
-109 - Input PDF has no pages (most likely a corrupt PDF file)
-200 ... -299 - these error codes are related to the input PDF parsing process (most likely the input PDF file is corrupted or has syntax errors);
-300 ... -399 - these error codes are related to the output PDF creation process (most likely the user account PDFresize is called from doesn’t have write permissions to the destination folder).
Using the graphic interface to resize PDF files
In order to resize files using the graphic interface you need to run PDFresize.exe located, by default, in the C:\Program files (x86)\neeviaPDF.com\PDFresize\apps folder.
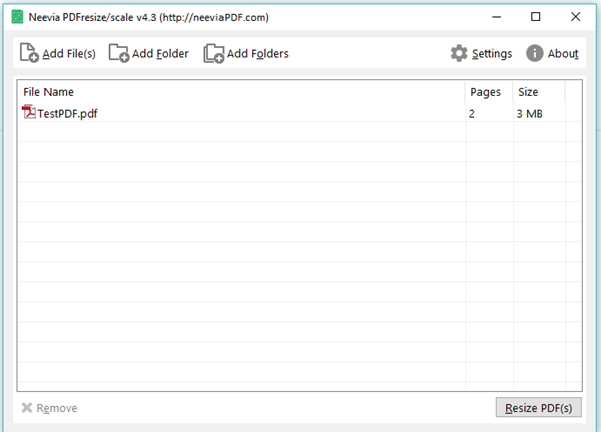
Click Add files to select the PDF file(s) to be resized. In case you want to resize all PDF files in a folder simply click Add Folder and navigate to the folder where your pdf documents are. For multiple folders click Add Folders.
Output Settings
Before resizing PDF files you need to specify the output settings. To do that click the Settings button. The interface below will be displayed:
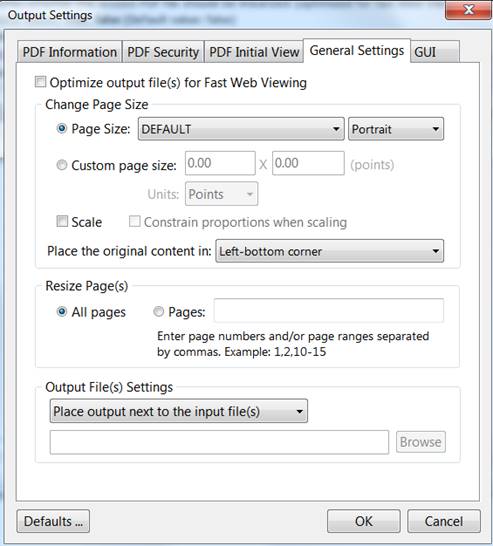
General Settings
In this window you can specify what settings to be used during the file resizing process.
· Optimize output file(s) for Fast Web Viewing - this option restructures the resulting PDF document for page-at-a-time downloading (byte-serving) which is especially important with large documents that can take a long time to download from a server.
· Change page size - this allows you to select the page size and orientation for the PDF document(s) you want to resize. In case you would like to define your own page size check Custom Page Size and enter your values for height and width specifying also the measurement units. Check Scale to scale the page content.
Make sure that Constrain proportions when scaling is checked in case you would like to maintain the original proportions between the new page dimensions and content
· Resize page(s) - select All pages to resize the entire file or Pages to resize specific pages or page ranges. Enter page numbers and/or page ranges separated by comma. Ex: 1,2, 10-15.
Output File(s) Settings - this allows you to specify where the resized file to be placed, which can be next to input file(s) or in a selected folder. In case you would like to replace the original file simply select Replace input file(s).
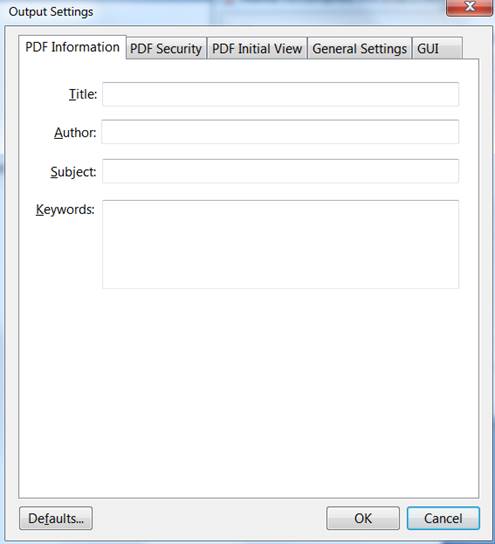
PDF Information
In this interface you you can specify Title, Author, Subject and Keywords for the resized file(s).
PDF Security
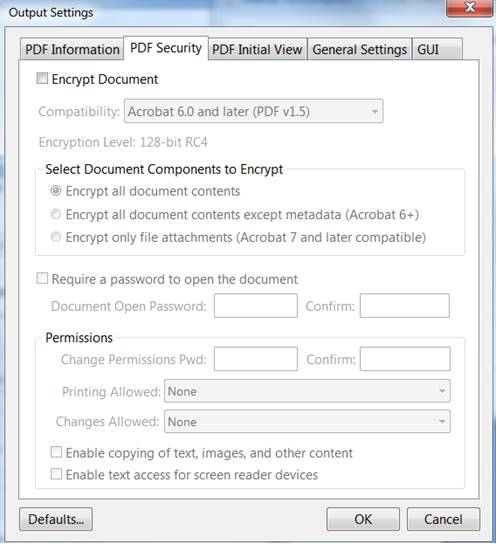
To encrypt the output PDF file(s), check Encrypt Document then select the encryption level from the Compatibility drop down box. There are 6 options:
- Acrobat 3.0 and later (PDF 1.2) enables 40 bit RC4 encryption (weak - not recommended)
- Acrobat 5.0 and later (PDF 1.4) enables 128 bit RC4 encryption
- Acrobat 6.0 and later (PDF 1.5) enables 128 bit RC4 encryption
- Acrobat 7.0 and later (PDF 1.6) enables 128 bit AES encryption
- Acrobat 9.0 and later (PDF 1.7) enables 256 bit AES encryption
- Acrobat X and later (PDF 1.7 ext 3) enables 256 bit AES R6 encryption
Encrypt All Document Contents
When you select this option both the document and document metadata will be encrypted. Search engines will not be able to access the document metadata when this option is used.
Encrypt All Document Contents Except Metadata
It is valid for Acrobat 6 and later. Only the content of a PDF document will be encrypted. Metadata remains fully accessible for search engines.
Encrypt only file attachments
Valid for Acrobat 7 and later. Only file attachments will be encrypted.
Require a Password to Open the Document
This allows you to set a password for opening the encrypted PDF.
Change Permissions Password
This password prevents users from changing the permission settings. The user can view the file in Acrobat Reader but must enter the specified Permissions password in order to change the file’s Security and Permissions settings.
Permissions
Printing Allowed - Specifies the level of printing that users are allowed for the PDF document.
Possible values:
None - Disables printing.
Low Resolution (150 dpi) - Users can print but the resolution will not be higher than 150-dpi. Each page is printed as a bitmap image which may cause files to print at a slower speed. To make this option available set the Compatibility option to Acrobat 5 (PDF 1.4) or later.
High Resolution - Allow users to print at any resolution. PostScript and other printers that come with high-quality printing features can be used.
Changes Allowed - Enables the editing actions that are allowed in the PDF document. Possible values:
None - when selected none of the changes listed in Changes Allowed drop down box, such as filling in form fields and adding comments are permitted.
Inserting, Deleting, And Rotating Pages - allows users to insert, delete, and rotate pages. Also bookmarks and thumbnails creation are permitted. This option works only for high (128‑bit RC4 or AES) encryption.
Filling in Form Fields and Signing Existing Signature Fields - when selected users can fill in forms and add digital signatures. Adding comments or creating form fields is not permitted. This option works only for high (128‑bit RC4, AES or AES256) encryption.
Commenting, Filling In Form Fields and Signing Existing Signature Fields - users are allowed to add comments, digital signatures and fill in forms. Moving page objects or create form fields is not permitted.
Page Layout, Filling in Form Fields and Signing - users can insert, rotate or delete pages and create bookmarks or thumbnail images, fill out forms, and add digital signatures. Creating form fields is not permitted. This option works only for low (40‑bit RC4) encryption.
Any Except Extracting Pages - allows users to edit the document, create and fill in form fields, add comments and digital signatures.
Enable Copying of Text, Images, and Other Content - allows users to select and copy
the contents of a PDF.
Enable Text Access For Screen Reader Devices For The Visually Impaired - when selected visually impaired users can read the document with screen readers. It doesn’t allow users to copy or extract the document’s contents. This option works only for high (128-bit RC4, AES or AES256) encryption.
PDF Initial View
In this window you can set the PDF Initial View options:
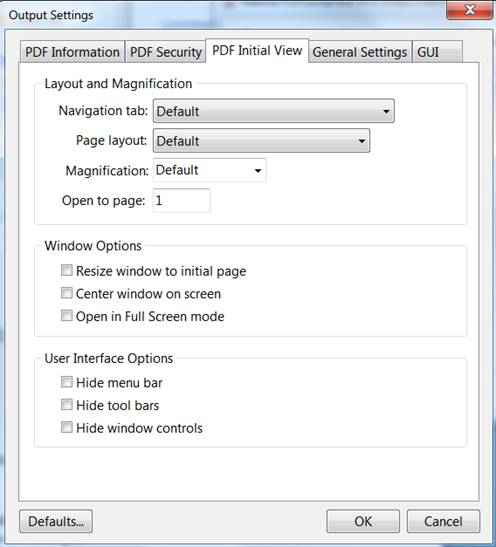
Navigation Tab - specifies which panels are displayed in the PDF viewer navigation pane.
Page Layout - specifies how document pages are arranged.
Magnification - use this to select at what zoom level the document will appear when opened.
Open To Page - specifies the page that appears when the PDF document opens.
Window Options - these options allow you to specify how the PDF viewer window adjusts in the screen area when a PDF document is opened.
Resize Window To Initial Page - adjusts the document window to fit snugly around the opening page, taking into account the options that you selected under Document Options.
Center Window On Screen - instructs the PDF viewer to position the window in the center of
the screen area.
Open In Full Screen Mode - maximizes the document window and displays the document
without the menu bar, toolbar, or window controls.
User Interface Options
These options allow you to specify which parts of the PDF viewer interface - the menu bar, the toolbars, and the window controls - are hidden.
Note: take into account that If you hide the menu bar and toolbars users cannot apply commands and select tools unless they know the keyboard shortcuts.
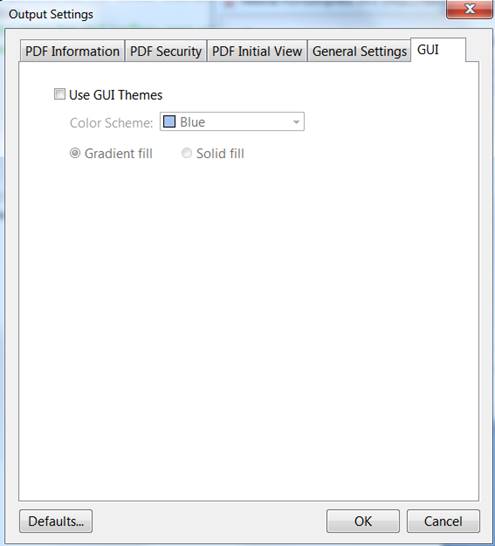
GUI - Graphic User Interface
In this window you can select the Graphic User Interface themes. Check Use GUI Themes to enable the Color Scheme. Once that is enabled check either Gradient fill or Solid fill to specify how the color will be displayed.
CODE SAMPLES
For a full and updated list of PDFresize code samples please visit http://neeviaPDF.com/support/examples/PDFresize/
Example 1vb. Resize a PDF file (Visual Basic)
Dim NVresize : Set NVresize = CreateObject("PDFresize.Neevia")
NVresize.Paper = "letter"
NVresize.Orientation = 2
Dim retVal : retVal = NVresize.ResizePDF("c:\in.pdf","c:\out.pdf")
If retVal <> 0 Then
MsgBox("Error code=" & CStr(retVal))
Else
MsgBox("Done")
End If
Example 1delphi. Resize a PDF file (Delphi)
procedure TForm1.Button1Click(Sender: TObject); var NVresize : Variant; retVal : Integer; begin NVresize := CreateOleObject('PDFresize.Neevia'); NVresize.Paper := 'letter'; NVresize.Orientation := 2; retVal := NVresize.ResizePDF('c:\in.pdf', 'c:\out.pdf'); if retVal <> 0 then Application.MessageBox(PChar('Error code=' + IntToStr(retVal)),'',0) else Application.MessageBox('Done','',0); end;
APPENDIX A. Predefined paper sizes
LETTER - 8.5"x11"
LETTER SMALL - 8.5"x11"
TABLOID - 11"x17"
LEDGER - 17"x11"
LEGAL - 8.5"x14"
STATEMENT - 5.5"x8.5"
EXECUTIVE - 7.3"x11"
A3 - 12"x17"
A4 - 8.3"x12"
A4 SMALL - 8.3"x12"
A5 - 5.8"x8.3"
B4 - 10"x14"
B5 - 7.2"x10"
FOLIO - 8.5"x13"
QUARTO - 8.5"x11"
10 X 14 - 10"x14"
11 X 17 - 11"x17"
NOTE - 12"x11"
ENVELOPE 9 - 3.8"x8.8"
ENVELOPE 10 - 4.2"x9.1"
ENVELOPE 11 - 4.1"x10"
ENVELOPE 12 - 4.3"x11"
ENVELOPE 14 - 5"x11"
C SHEET - 8.3"x12"
D SHEET - 8.3"x12"
E SHEET - 8.3"x12"
ENVELOPE DL - 4.3"x8.7"
ENVELOPE C5 - 6.4"x9"
ENVELOPE C3 - 13"x18"
ENVELOPE C4 - 9"x13"
ENVELOPE C6 - 4.5"x6.4"
ENVELOPE C65 - 4.5"x9"
ENVELOPE B4 - 9.8"x14"
ENVELOPE B5 - 6.9"x9.8"
ENVELOPE B6 - 6.9"x4.9"
ENVELOPE ITALY - 4.3"x9.1"
ENVELOPE MONARCH - 3.9"x7.5"
ENVELOPE PERSONAL - 3.6"x6.1"
FANFOLD US - 15"x11"
FANFOLD STD GERMAN - 8.1"x12"
FANFOLD LGL GERMAN - 8.1"x13"
ISO B4 - 9.8"x14"
JAPANESE POSTCARD - 3.9"x5.8"
9 X 11 - 9"x11"
10 X 11 - 10"x11"
15 X 11 - 15"x11"
ENVELOPE INVITE - 8.7"x8.7"
RESERVED 48 - 8.3"x12"
RESERVED 49 - 8.3"x12"
LETTER EXTRA - 9.3"x13"
LEGAL EXTRA - 9.3"x15"
TABLOID EXTRA - 12"x18"
A4 EXTRA - 9.3"x13"
LETTER TRANSVERSE - 8.3"x11"
A4 TRANSVERSE - 8.3"x12"
LETTER EXTRA TRANSVERSE - 9.3"x12"
A PLUS - 8.9"x14"
B PLUS - 12"x19"
LETTER PLUS - 8.9"x13"
A4 PLUS - 8.3"x13"
A5 TRANSVERSE - 5.8"x8.3"
B5 TRANSVERSE - 7.2"x10"
A3 EXTRA - 13"x18"
A5 EXTRA - 6.8"x9.3"
B5 EXTRA - 7.9"x11"
A2 - 17"x23"
A3 TRANSVERSE - 12"x17"
A3 EXTRA TRANSVERSE - 8.3"x17"
DBL JAPANESE POSTCARD - 7.9"x5.8"
A6 - 4.1"x5.8"
JENV KAKU2 - 8.3"x12"
JENV KAKU3 - 8.3"x12"
JENV CHOU3 - 8.3"x12"
JENV CHOU4 - 8.3"x12"
LETTER ROTATED - 11"x8.5"
A3 ROTATED - 17"x12"
A4 ROTATED - 12"x8.3"
A5 ROTATED - 8.3"x5.8"
B4 JIS ROTATED - 14"x10"
B5 JIS ROTATED - 10"x7.2"
JAPANESE POSTCARD ROTATED - 5.8"x3.9"
DBL JAPANESE POSTCARD ROTATED - 5.8"x7.9"
A6 ROTATED - 5.8"x4.1"
JENV KAKU2 ROTATED - 8.3"x12"
JENV KAKU3 ROTATED - 8.3"x12"
JENV CHOU3 ROTATED - 8.3"x12"
JENV CHOU4 ROTATED - 8.3"x12"
B6 JIS - 5"x7.2"
B6 JIS ROTATED - 7.2"x5"
12X11 - 12"x11"
JENV YOU4 - 8.3"x12"
JENV YOU4 ROTATED - 8.3"x12"
P16K - 5.8"x8.5"
P32K - 3.8"x5.9"
P32KBIG - 3.8"x5.9"
PENV 1 - 4"x6.5"
PENV 2 - 4"x6.9"
PENV 3 - 4.9"x6.9"
PENV 4 - 4.3"x8.2"
PENV 5 - 4.3"x8.7"
PENV 6 - 4.7"x9.1"
PENV 7 - 6.3"x9.1"
PENV 8 - 4.7"x12"
PENV 9 - 9"x13"
PENV 10 - 13"x18"
P16K ROTATED - 8.5"x5.8"
P32K ROTATED - 5.9"x3.8"
P32KBIG ROTATED - 5.9"x3.8"
PENV 1 ROTATED - 6.5"x4"
PENV 2 ROTATED - 6.9"x4"
PENV 3 ROTATED - 6.9"x4.9"
PENV 4 ROTATED - 8.2"x4.3"
PENV 5 ROTATED - 8.7"x4.3"
PENV 6 ROTATED - 9.1"x4.7"
PENV 7 ROTATED - 9.1"x6.3"
PENV 8 ROTATED - 12"x4.7"
PENV 9 ROTATED - 13"x9"
PENV 10 ROTATED - 18"x13"
A0 - 33"x47"
A1 - 23"x33"
ANSI C - 17"x22"
ANSI D - 22"x34"
ANSI E - 34"x44"
ARCH A - 9"x12"
ARCH B - 12"x18"
ARCH C - 18"x24"
ARCH D - 24"x36"
ARCH E - 36"x48"
ARCH E1 - 30"x42"